Lab 4- DNA Analysis
October 9, 2014 -October 15, 2014
This lab was several overlapping experiments that took place over two weeks. First, we needed to mix proportional solutions in lab 4a; then, in lab 4b, we spooled the DNA. These initial steps are essential to set up the analysis for the DNA samples in gel electophoresis. In the third part of the lab, we created the gels before moving onto part four, loading the wells with the DNA samples and running electrical currents through the gels and observing the DNA.
Materials: Analytical balance, Tabletop balance, Weigh paper, Lab scoops, Capped tubes(15 mL), Tube racks, Graduated cylinder(100 mL), pH strips, Glass rods, Sodium chloride, TRIS, EDTA, Sodium hydrochloric acid, Sodium hydroxide, Distilled water, Capped bottles, Vortex mixer, Beakers(50 mL), DNA(Salmon sperm), Pipets(2 mL, 25 mL, 5 mL), Micropipets(2-20 microliters, 20-200 microliters), Ethanol, TAE buffer(40% concentration), Agarose, Microwave, Hot hand protectors, Power supply, Reaction tubes(1.7 mL), Loading dye(6x), Gel box(horizontal), Ethidium bromide, Gel photo imaging system, Gloves, Microcentrifuge, Gel tank, Saran wrap, Sharpie
Hypothesis: If the DNA particles are larger, then it will take longer to run through the agarose gel and the bands will show up thicker under the UV light.
Lab 4a- Creating Solutions for DNA Isolation
Thursday, October 9, 2014
Purpose: The point of this lab was to create two different solutions by adding various amounts of specific substances at the proper proportions. The two solutions were 10 milliliters of 5 mole NaCl solution and 100 milliliters of 10 micro moles of TRIS and 1 micro mole of EDTA.
Reasons for TRIS, EDTA, NaCl: NaCl is used because sodium is positive and phosphate has a negative three charge; the addition of positive molecules keeps the DNA from pushing away by decreasing the amount of negativity. This will help bond the precipitate together; a precipitate is a substance taken out of a solution during precipitation. TRIS is used to maintain the level of pH because if a solution is not near neutral, the DNA could unravel. EDTA serves the purpose to denature the activity of DNases. DNases are enzymes that break down protein and EDTA prevents this by binding calcium and magnesium. Calcium and magnesium are co-factors of the enzymes that break down the proteins and DNA.
Procedure Part One: The beginning portion of this lab was to mix a sodium chloride solution. The first essential step was to calculate the correct amount of each substance to add create the right concentration. Use the molarity formula to find the mass of the substance needed. *See calculations below* Use a table top balance and set the scale equal to zero after adding a piece of weight paper to counteract the mass of the paper. Scoop an approximated amount of NaCl onto the folded weigh paper and adjust the amount depending on the results of the balance. After the scale reaches the desired number, remove the weigh paper without spilling any of the substance. The folds in the paper will make the NaCl easier to transport and manage to pour into the conical tube. After the addition of 10 mL of distilled water, cap the solution and vortex the tube until the sodium chloride is completely dissolved. Label the solution and store in a freezer.
Procedure Part Two The next step in this lab was to make the TE buffer by mixing TRIS and EDTA to 100 mL of water. Calculations were needed to find the proper amount TRIS or EDTA that was to be combined; one separate calculation for each substance. Use a highly sensitive analytical balance to measure the mass of the substances because it needs to be precise since the digits range in the hundredths. Place a small amount of TRIS onto folded weight paper and slowly augment the amount if needed. If there is too much, take the paper off the balance and pour out a portion of the collection instead of scooping parts directly off the scale. This detail is crucial because a person could accidentally place too much pressure on the scale and break the expensive equipment. Weigh both substances separately before adding both to a beaker filled with 80 mL of distilled water. Test the pH level and add an acidic or basic substance to raise or lower the pH to 7-8. After the acidity is correct, add another 20 mL of distilled water to reach the final volume. Then transfer the solution to a labelled bottle before placing it in a freezer.
|
Calculations: (Molarity) x (Volume) x (Formula Weight) = grams of substance needed
NaCl- (5 M)(0.01 L)(58.44 g/mol) = 2.92 grams TRIS- (0.01 M)(0.1 L)(157.6 g/mol) = 0.158 grams EDTA- (0.001 M)(0.1 L)(372.24 g/mol) = 0.037 grams |
Conversions to Liters and Moles:
10 mL= 0.01 L 10 mM= 0.01 M; 100 mL= 0.1 L 1 mM= 0.001 M; 100 mL= 0.1 L |
Lab 4b- DNA Spooling
Friday, October 10, 2014
Purpose: The purpose of this section was to observe the physical appearance of DNA and to separate DNA from the cell.
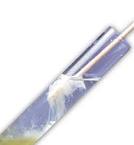
Procedure: Throughout the lab, we needed to record observations concerning the color, viscosity, and appearance. The first step in order to do this is to dilute the salmon sperm to 2 mg/mL with TE buffer. The solution appear clear and could jiggle, but it was still a liquid. Then, we used a micropipet to add 500 microliets of 5M NaCl solution and mixed it by gently swirling the container. Then, we slowly added a layer of 4 mL of alcohol down the side of the beaker so it did not mix with the DNA. The mixture looks clear with a distinct separation between the alcohol and the DNA and slat. The DNA section seems more conglomerated and has a filmy layer across the interface. The next step was to spool the DNA using a glass rod at the interface of the two substances. With the container at an angle, twirl the rod to pull out the DNA that has been separated from the alcohol. The DNA appeared very sticky and goopy. It was relatively easy to extract all of the DNA from the container. After observations, the ethanol was dripped onto paper towels before the DNA into a conical tube already holding 2 mL of TE buffer. Then store in a freezer before using DNA to run through gels. Are you a micro molecule? Because you're a-mean-o... acid.
Calculations: (C1)(V1) = (C2)(V2)
(4mg)(V) = (2mg)(2mL) V1 = 1mL of DNA; therefore, 1mL of TE buffer
(4mg)(V) = (2mg)(2mL) V1 = 1mL of DNA; therefore, 1mL of TE buffer
Lab 4i- Making Gels to Separate DNA Fragments
Monday, October 13, 2014
Purpose: This step of the lab was to create a gel for the DNA fragments to run through.
Reason for TAE and Agarose: TAE stands for TRIS-acetate-EDTA. As stated in a previous section, TRIS maintains the pH level and EDTA prevents DNases activity to stop the break down of proteins. Acetate has the chemical structure similar to sugar, CH3COO- and prevents DNA clumping. This is essential for the observations because the DNA has to be able to travel through the gels.
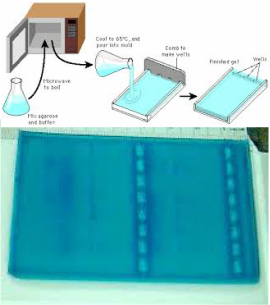
Procedure: A gel of 0.8 percent agarose needed to be prepared with the appropriate concentration. First, we made 500 mL of 1x TAE by diluting a 40 percent TAE buffer. We used the formula that used proportions to accurately determine the needed volume for the first solution depending on the concentration and volume of the solution we desired. Then we used 50 mL of the thinned TAE buffer and mixed it with 0.4 grams of agarose, measured with an analytical balance, in an Erlenmeyer flask to make a solution with 0.8 percent agarose. (See calculations below) Then, using a microwave oven, we heated the flask until the solution was properly dissolved. In between heating intervals, we gently swirled the liquid to ensure it was properly mixed. While waiting for the microwave, we taped the open sides of a horizontal gel box and placed two combs in selected notches to create sets of wells once the gel solidified. After the solution cooled to a reasonable temperature, so it wouldn't unseal the adhesive on the painters' tape, we steadily poured the contents into the gel mold. Then, we labeled and wrapped our cooled gel in Saran Wrap before storing it for use the following day.
Calculations: (C1)(V1) = (C2)(V2)
1x TAE Buffer- (40x)(V) = (500 mL)(1x) V1 =12.5 mL
Agaorse- (0.008)(50 mL) = 0.4 grams
1x TAE Buffer- (40x)(V) = (500 mL)(1x) V1 =12.5 mL
Agaorse- (0.008)(50 mL) = 0.4 grams
Lab 4j- Gel Electrophoresis to Analysise DNA Molecules
Wednesday, October 15, 2014
Purpose: The purpose of this section was to observe the appearance of DNA samples.
Reasons for Loading Dye and Ethidium bromide: The loading dye served two purposes; the first was to color smaller particles so there were visible particles to observe to ensure the DNA samples did not run off the gel. Smaller molecules have an easier time traveling through the spaces made by the gel. This means the colored particles will travel in front of the DNA sample so we can estimate the location of the DNA. Another purpose for the loading dye was the glycerol contained in the liquid. Glycerol makes the samples sink to the bottom of the wells and not float across the top of the gel. In order to achieve results from electrophoresis, the DNA samples needed to travel through the gel, not over the top or around the gel. Ethidium bromide was used to stain the gel so the DNA samples would be visible under the UV light. However, ethidium bromide is a dangerous carcinogen and can cause skin cancer if not handled properly.
Procedure Part One: The next section of the lab was running the samples through the gel and use electricity to separate the molecules based on size. To do this, we needed to fill the wells in the gel with DNA and loading dye. First, we placed the gel box into an empty gel tank before completely submerging the gel with 1x TAE buffer. With the liquid covering the gel, we gently removed the two combs.
Procedure Part Two: Each group member prepared individual samples of DNA and loading dye to insert into the wells. We measured 20 microliters of salmon sperm with a 2-20 mircopipet and filled 1.7 mL tubes with the liquid. Before extracting the sperm, we made sure to suspend the liquid to ensure DNA was actually extracted. Then, we added 4 microliters of loading dye that was six times as concentrated and mixed the two liquids with a mini centrifuge. The mini centrifuge spun the containers, which were angled, in a circle to force the liquid to gather at the bottom of the tube. Using a 20-200 micropipet, we gathered the samples and carefully inserted it into the gels. In order to receive accurate results, we needed to follow certain guidelines while filling the pipet and the wells. While loading the pipet, we needed to guarantee that there was no air bubbles in the pipet because the air could potentially force the DNA sample to rise out of the well and travel across the top, instead of running through the gel. Another point that was essential was confirming the pipet tip did not puncture the bottom layer of the gel. A hole beneath the well could lead to the sample draining out through the bottom of the gel.
 From left to right: Daria, Daria(not a typo), Natalie, Ananya, Amritha, Emmy
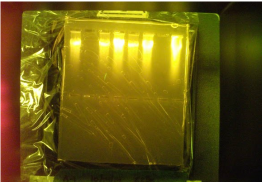
Procedure Part Three: The next step in the experiment was to connect the electrodes to the gel tank and send approximately 110 volts through the gel. Since the red cables are positive and the black cables are negative, we needed to connect the electrodes properly and ensure that the current would move the samples in the correct direction. After noting the gels where correctly connected, we waited forty minutes before checking the progress. After this, we drained the TAE buffer off and transferred the gels to plastic box. Then, our teacher covered the gels with ethidium bromide before rinsing the EtBr off. The next day, we tried to observe the samples under in a UV light box and take pictures, but none of the DNA fragments showed up.
Results from Entire Lab Experiments
Thursday, October 16, 2014
Thursday, October 16, 2014
In order to study genetics, isolating the DNA from the other molecules in a cell is extremely important. Since DNA is naturally found in the nucleus, scientist need to separate it from the other organelles inside the cell. By studying DNA independently, people can learn more about protein sequences and apply it in a biotechnology or bioengineering laboratory. Scientist constantly need to run gels and personally prepare concentrations of different solutions until the scientist is known enough to gain an assistant. To be able to complete this step is essential in most researches concerning biology.
Conclusion: Despite the long process, the results were not conclusive. While looking through the UV light box, no group was able to find DNA fragments. One possible reason for this would be the DNA traveled out of the gel through the bottom or out the sides. However, the likelihood of this happening for every single sample in every single group is highly improbable. Another possibility would be the time the gels spent staining in ethidium bromide was too short. Unfortunately, another class also had the same issue even though their gels spent hours overnight in EtBr. A different conclusion could be the ethidium bromide being expired; because each experiment had the exact same ethidium bromide, it is possible for this to be the cause for the lack of DNA appearance. One way to test this is to place a drop of DNA with EtBr under the UV light and observe whether or not an orange dot appears. If there is not a dot, then the ethidium bromide was not effective. Another way to test the ethidium bromide is by making a new batch of EtBr and rerun the gels using the new ethidium bromide. These are several explanations to predict why the results of the lab was not our desired outcome.
Conclusion Part Two: After my teacher remade a batch of ethidium bromide, the DNA samples could be viewed under the UV light. The names show each person's sample of DNA(and no, I did not make a typo, Daria tested two samples because the first trial was wrong for her). Typically DNA would appear in small oval bands located throughout the gel depending on the size of the molecule. However, our DNA molecules were bigger than normal and this is explained in two ways. First of all, the size of the orange glow is larger and takes up more space than other results. Another way to discover this is because the DNA molecules did not travel far away from the loading wells. This means our hypothesis was correct and that the molecules moved slower through the gel because their size was a limitation to the movement.
Reflection: Throughout this lab, collaboration between group members was strong, but efficiency could be improved. One issue was that our class proceeded through the lab together step by step. Regardless of the time needed to complete making a solution, we could not advance in the experiment until all the student groups finished the prior step. This style of work made this lab longer to complete. Another issue with efficiency was the time it took to measure each substance. Since there were only two scales, the entire class needed to share and the precision factor made the wait for the balances long. We could possibly improve this by splitting up the amount of people at each scale and have specific members measure one substance while the other half of our group measure the other substance. Due to the lack of materials in the biotech lab, several steps of the experiment required a lot of standing around time.
One good point of this lab was our collaboration skills. Our group was consistently on task and completed each step of the procedure without becoming distracted by other topics of discussion. Another successful part was the precision of each step. This lab required many processes that led to the next step; our group was good at competing each task properly so the following experiment was accurate.
Our group's skill handling the materials was above average. We were very coordinated in mixing and measuring solutions and changing the pH level to the proper place. However, a couple of group members struggled greatly using the micropipets in the final stages of the lab. Personally, I was able to successfully use the pipet on the first time, but other people kept gathering air bubbles in the end. I believe a little more practice would be beneficial to certain people in the class, but not everyone.
