Passive Solar Home Design
March Sixth, Two Thousand Fourteen
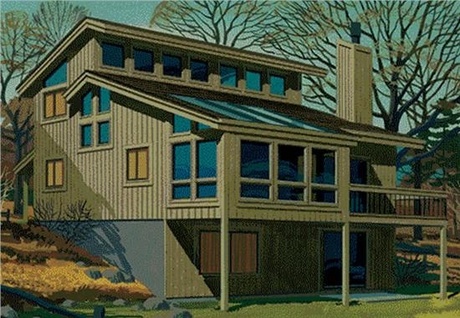
The goal of this project was to learn about efficient day lighting techniques by designing a building that has no need for electricity or heating. In order to build an energy efficient home, we used passive solar techniques to directly use the sun's thermal energy and light. Throughout the course of the project, our group learned how to design a water heater, vertical and horizontal wind turbines, test building materials for diverse properties, and plan a house structure to provide the most light. All of these smaller experiments led up to the main focus, which was actually blueprinting, budgeting, and presenting our own creative ideas for a small building. Eventually, the plans of one group's house will be placed into effect and the STEM program will physically construct the building on San Marin's campus. Over two months were dedicated to the ambiguous designing portion; this project varied quite a lot from all the previous ones for several reasons. Each separate portion need to be very precise and there were many differentiating parts that contributed to the final outcome.
Solar Water Heater
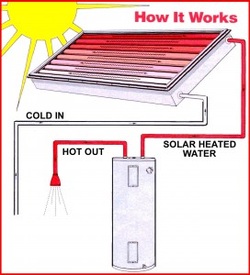
The first portion of this unit was to construct a passive solar water heater. Using copper wiring, clear tubing, aluminum, and several household items, such as a plastic bottle, a box, a paper bag, and tissue paper, we built a multistory water channel. After drilling a hole towards the bottle of the plastic bottle, we inserted a two foot transparent tube to seal the space. This tubing was connected to approximately three feet of bent copper. The copper tube was bent to create several turns in the short length; the copper was also located inside of the open box. To begin circulating the water, we would first pour a liter of water into the big plastic bottle which was located higher up. We would wait until the water flowed through the clear tube, into the copper tubing near the ground, and out the end of the copper passage. As the liquid traveled through the copper, the sun's thermal energy would be absorbed because copper is a very conductive material. Then, the slightly warmer water would drip into cups and be poured back into the plastic bottle to continue the cycle. To build a power plant.
What happens to a barefoot man if he steps on an electrical wire? Because the goal of this project was to heat the water, my group made a few modifications to the design in an attempt to preserve or absorb more of the sun's thermal energy. First, we placed the plastic bottles in a grocery bag with several layers of tissue paper for insulation. Tissue papers works well for trapping heat because it contains many air pockets and can easily wrap around the bottle. Another tactic we used to store the heat was double layering the Styrofoam cups when circulating the water. This insured that a minimal amount of heat was lost during the transportation of previously heated water. Another efficient way to gather more heat was to absorb more thermal energy as the water traveled through the circuit. We lined the bottom of the box that held the copper with aluminum foil. This material reflected rays from the sun onto the copper tube carrying the water. We also used aluminum foil to construct a wide reflector that rested above the box at a ninety degree angle. This was beneficial because it captured a larger range of sunlight and projected it onto the conductive material. We also secured saran-wrap above the copper tube to create a greenhouse gas effect. This technique trapped the heated air particles inside of the box to augment the average temperature around the copper tubing and the water. A final adjustment performed was the angle the box was tilted. Since the sun does not travel directly over head during the winter in Novato the beams of light won't hit at a ninety degree angle*. To change this, we placed supports on the back of the box that was holding the copper so the interior was tilted towards the south.
Although the ideas were creative, there were several issues present in this project. The first time we placed water into the bottle, the clear tube was not connected. This caused water to spill everywhere and our insulation bag, tissue paper, and part of the box was disintegrated. The next day, my group was forced to rebuild the parts that were destroyed; the next time, we were extremely careful when pouring the water to make sure it didn't splash anywhere. Another problematic point in this project was bending the copper tubing. It is very arduous to curve the copper accurately but not kink the inner passage. Finally, the sun's amount of thermal energy varied drastically as the day changed or clouds moved past. This especially made an impact in the results if we compared the morning class' data to my afternoon period.
*For more information concerning the travel path of the sun view Reasoning Behind Design section.
|
|
Reasoning Behind Designs
Due to studies of the sun and earth's location the sun appears to travel in the south. Although this celestial star 'rises' in the east and 'sets' in the west the sun will always be present in the southern part of our sky. This occurs because Novato is located north of the equator. This causes seasons to be the opposite in the southern hemisphere; countries located south of the equator receive maximum amounts of sunlight at different times of the year, opposed to people who live in the northern hemisphere. During the winter, the sun appears to be lower in the sky; this causes a less precise ninety degree angle when the sun reaches our location. This is one reason why it is colder in the winter than in the summer. If a person lives in the north pole, during the summer, there will be time periods when the sun never sets. The giant star may dip and change positions, but it will constantly stay visible during this season. This occurs due to the fact that the Earth's axis is so great and the north poles are where the angle is the most apparent. *I will add more information when I am not sleep deprived and it is a logical time to actually be conscious. Sorry for the inconvenience. |
Daylighting Techniques
For designing our passive solar home, we needed to figure out which methods would provide the most light during different times of the day or seasons of the year. There are several diverse styles the amount of sunlight can be maximized depending on the position of the sun. Daylighting is when certain appliances are placed in beneficial locations in order to intensify the amount of natural light reaches the interior rooms of a building. Common practices include clerestory windows, big picture windows, skylights, solar tubes, and light shelves. Clerestory windows are shorter windows place towards the top of the wall that are good at receiving winter sunlight, but denying summer light. These windows are often found in bathrooms to provide privacy, but still allow rays of light. Big picture windows are generally found in bedrooms. Skylights are expensive components to install, but they allow sunlight into the house year around. Solar tubes are circular tubes with the interior walls lined with reflective material. The top is a small dome shaped cover to absorb sunlight coming from all angles; the cover is the only feature that is visible from the outside. Solar tubes are useful if a house has an attic, but people wanted light to reach the main floor of the house. The purpose of light shelves is to amplify the amount of sunlight but using reflective platforms. These ledges, located outside, rebound the original sunlight onto the top of the roof inside the building. The white ceiling should cast extra light back into the room. He gets a pair of shocks.
The idea of this basic project was to remodel a home to decrease the amount of electrical use in an average house without factoring in heat. It is tacit that the house should not be completely made out of transparent windows. We began by sketching a thousand square foot house with absolutely no windows or skylights; then figure out the number of lightbulbs needed for people to occupy the building. From this point, the number of turned on hours per bulb was calculated be approximating the time spent in each room every day and taking the average. This was multiplied by sixty, the wattage of general lightbulbs, to find the amount of electricity invested in an average house per day. Our goal was to design a more energy efficient house that consumes less electrical energy by applying day lighting techniques. In order to grasp an idea of which devices were successful, our group used at least each type of method once while reconstructing our model house design. The layout of the house remained the same, but several windows, one skylight, multiple solar tubes, and a couple of light shelves at various heights were added. What happens when the electricity goes out in Caspar's house?
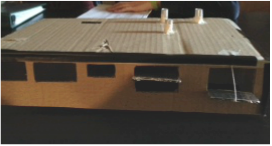
To test our ideas, we constructed a cardboard model that was scaled to the correct proportions. After guaranteeing there were no holes where the walls intersect, we stimulated a winter and summer day. By turning off the classroom lights, several groups activated the testing. First, we measured out the proper angles the sun should pass in Novato, California during the winter and summer by using a protractor and meter stick. After the angles were set, group members slowly lifted a lightbulb across the assumed path to substitute for the sun. Then, my group recorded the approximation of percentage of sunlight that actually reached each room. Our data chart displayed different times of day, season, and amount of light in each room. After the result were concluded, we analyzed our information by comparing the rooms with the most daylight and determining which technique was used for that room. It seemed the more windows, the more light was allow into our building. The light shelves work very well and shone light onto the cardboard ceiling. If the roof was a light colour, the sunlight would have provided light for the entire room. Unfortunately, the solar tubes showed little to no signs of improvement in terms of gaining light. The hallways was almost completely black because the solar tubes were the only feature providing light. The skylight contrived the same results as the windows because it is essentially a window on the ceiling; one issue with skylights is the amount of heat lost because heat rises. Luckily, this was no the focus of this current model design.
This aspect of our project taught me several things. First of all, I learned about the sun's path of travel*. Although I already was aware the sun travels in a certain direction, I never realized that the angle of the sun can change drastically within six months. Another part I learned from daylighting design was the purpose of the daylighting techniques. Each method contributes to different aspects of lighting a house and are beneficial for diverse reasons. He re-fused to put the power back on.
*Whenever I use the term "sun's path", I am aware the sun does not actually move; the Earth revolves and rotates around the sun. It is merely simpler and easier to describe, rather than typing, "the certain angle of Earth's tilted axis that portrays that the sun is traveling around our planet, Earth, in a specific path that is variable depending on the seasonal differences that occur annually at diverse periodical times throughout the year".
For designing our passive solar home, we needed to figure out which methods would provide the most light during different times of the day or seasons of the year. There are several diverse styles the amount of sunlight can be maximized depending on the position of the sun. Daylighting is when certain appliances are placed in beneficial locations in order to intensify the amount of natural light reaches the interior rooms of a building. Common practices include clerestory windows, big picture windows, skylights, solar tubes, and light shelves. Clerestory windows are shorter windows place towards the top of the wall that are good at receiving winter sunlight, but denying summer light. These windows are often found in bathrooms to provide privacy, but still allow rays of light. Big picture windows are generally found in bedrooms. Skylights are expensive components to install, but they allow sunlight into the house year around. Solar tubes are circular tubes with the interior walls lined with reflective material. The top is a small dome shaped cover to absorb sunlight coming from all angles; the cover is the only feature that is visible from the outside. Solar tubes are useful if a house has an attic, but people wanted light to reach the main floor of the house. The purpose of light shelves is to amplify the amount of sunlight but using reflective platforms. These ledges, located outside, rebound the original sunlight onto the top of the roof inside the building. The white ceiling should cast extra light back into the room. He gets a pair of shocks.
The idea of this basic project was to remodel a home to decrease the amount of electrical use in an average house without factoring in heat. It is tacit that the house should not be completely made out of transparent windows. We began by sketching a thousand square foot house with absolutely no windows or skylights; then figure out the number of lightbulbs needed for people to occupy the building. From this point, the number of turned on hours per bulb was calculated be approximating the time spent in each room every day and taking the average. This was multiplied by sixty, the wattage of general lightbulbs, to find the amount of electricity invested in an average house per day. Our goal was to design a more energy efficient house that consumes less electrical energy by applying day lighting techniques. In order to grasp an idea of which devices were successful, our group used at least each type of method once while reconstructing our model house design. The layout of the house remained the same, but several windows, one skylight, multiple solar tubes, and a couple of light shelves at various heights were added. What happens when the electricity goes out in Caspar's house?
To test our ideas, we constructed a cardboard model that was scaled to the correct proportions. After guaranteeing there were no holes where the walls intersect, we stimulated a winter and summer day. By turning off the classroom lights, several groups activated the testing. First, we measured out the proper angles the sun should pass in Novato, California during the winter and summer by using a protractor and meter stick. After the angles were set, group members slowly lifted a lightbulb across the assumed path to substitute for the sun. Then, my group recorded the approximation of percentage of sunlight that actually reached each room. Our data chart displayed different times of day, season, and amount of light in each room. After the result were concluded, we analyzed our information by comparing the rooms with the most daylight and determining which technique was used for that room. It seemed the more windows, the more light was allow into our building. The light shelves work very well and shone light onto the cardboard ceiling. If the roof was a light colour, the sunlight would have provided light for the entire room. Unfortunately, the solar tubes showed little to no signs of improvement in terms of gaining light. The hallways was almost completely black because the solar tubes were the only feature providing light. The skylight contrived the same results as the windows because it is essentially a window on the ceiling; one issue with skylights is the amount of heat lost because heat rises. Luckily, this was no the focus of this current model design.
This aspect of our project taught me several things. First of all, I learned about the sun's path of travel*. Although I already was aware the sun travels in a certain direction, I never realized that the angle of the sun can change drastically within six months. Another part I learned from daylighting design was the purpose of the daylighting techniques. Each method contributes to different aspects of lighting a house and are beneficial for diverse reasons. He re-fused to put the power back on.
*Whenever I use the term "sun's path", I am aware the sun does not actually move; the Earth revolves and rotates around the sun. It is merely simpler and easier to describe, rather than typing, "the certain angle of Earth's tilted axis that portrays that the sun is traveling around our planet, Earth, in a specific path that is variable depending on the seasonal differences that occur annually at diverse periodical times throughout the year".


Material Testing
In order to build the most energy efficient house we needed different qualities in our material. For different walls or sections of our building, we wanted to utilize the diverse properties of each material, such as reflection, absorbing, and specific heat capacity*. The purpose of this experiment was also to figure out the amount of time heat can be trapped and the time limit before an object reaches its maximum temperature. To obtain accurate and realistic data, our class all contributed to one major experiment. The process of our experiment was to lay materials under a steady heat source, such as a lightbulb, and measure the temperature at identical intervals. As a group, we brainstormed possible building materials for the interior walls, exterior walls, roof, flooring, and insulation that could possibly appertain to our custom designs. Then, we decided on certain parameters and constant variables, such as the time length, heat applied, distance from the heat source, size of object, and surface the material rested on. It is crucial for each group to assemble their material test exactly like surrounding participants for authentic results. For the first forty minutes, the room temperature materials would be located a foot away from a sixty-watt light bulb. The bulb would be switched on for the purpose of heating a square foot of each designated material. Due to a shortage of lightbulbs, approximately two or three sections of material would be situated under a single bulb. As the heat of the objects gradually increased, the temperature was observed at ten minute incriminates; this included the original starting temperature. After four recordings were noted, the lightbulbs were powered off**, but groups were still required to measure the temperatures every ten minutes. This proceeded until another forty minutes passed and the majority of the materials reached points close to the original temperature. Each set of students was responsible for sharing the information gathered and recording the data onto a whiteboard chart. Why is wind power so popular?
To test the insulation, we had to design a slightly different experiment. Our class decided to examine fiberglass batting, spray foam, Styrofoam, and shredded jeans. The idea of the tests was to figure out which material held heat in the most efficient method. In order to test our theories, our class suggested that one group wrap each insulating material around a beaker of water and measure the rate the water cools. For this section of the project, two groups assisted each other in this controlled experiment. A large container of water was boiled to seventy-five degrees Celsius before the heated water was distributed proportionately among five 100 milliliter beakers. Various Insulation materials covered each beaker separately; one water container was left uncovered to set a common rate of cooling to compare our later results. Although this experiment acquired more time to fabricate and set up, the two groups responsible still recorded the temperature of the water every ten minutes. Instead of removing the insulation after forty minutes, the data modeled a steady decrease as time progressed; we already had a constant rate of heat loss. This experiment did not test absorption, reflection, or specific heat because it produced results portraying which insulation is able to trap heat.
For unique materials, the rate of augmentation or decline in temperature indicated the amount of absorption, reflection, or the specific heat capacity. If a material demonstrated a greater change in temperature in the first forty minutes, this meant that it can absorb more heat. If the inverse of this situation occurs and a minimal amount of temperature is increased, the material is probably very reflective. Since energy cannot be created nor destroyed, the lightbulbs' thermal energy has to travel somewhere else if it is not absorbed into the material. To figure out whether a material has a high specific heat, we compared the rate of decline after the heat source disappeared. If an object lost heat slowly, the material would remain at a relatively high temperature and would have a high specific heat. The materials that possessed high specific heat tend to warm up slower or not as much. Vice versa for objects that contain a low heat capacity. For the insulation experiment, all of the materials were very successful and remained within a degree Celsius of each other. These results were slightly inaccurate because the top of the water beakers were left uncovered. Due to the fact that heat rises*, the majority of the water's thermal energy escaped from the top where there was no insulation. Since there was a great difference between the room temperature and boiling water, the first measurements portrayed drastic changes in all of the subjected insulation materials. As the experiment progressed, the change of temperature gradually became less apparent, but still noticeable.
Since there was an abundance of compiled information and numbers, I graphed the top three materials for each section. I overlapped materials that contained similar properties and displayed them on the same graph. For exterior walls and interior walls, my group was searching for an absorbent material for the colder seasons. The insulation needed to trap heat in order to raise the overall temperature of the building, as well. As for the roof, my group sought a material that would be able to reflect the sun's light rays; this would insure that the building would not overheat during the summer. The graphs created a visual perspective that enforced the idea certain materials would be better suited for different purposes in our building. These graphs also created it simpler to analyze the mass amount of data we collected.
*See Physics Principles for more descriptive information concerning specific heat of objects and the reasoning that explains why heat rises.
**Or the lightbulbs became unaroused...because they got turned off. (Cue snare and symbol crash for my punderful joke!)


Energy Source From Wind
There are two general types of wind turbines, horizontal axis and vertical axis wind turbines. Horizontal axis wind turbines, known as HAWTs, are usually the type of wind turbine most people will visualize at the mention of a windmill. These particular wind turbines have a center that rotates horizontally like a pin wheel. Vertical axis wind turbines, known as VAWTs, are less commonly built. These wind turbines rotate in a circle, from birds' eye view, and the blades usually form a cylindrical shape.
Horizontal axis wind turbines tend to generate more power from the kinetic energy of wind. This difference is caused due to the number of blades the wind is in contact with. For HAWTs, the air is constantly reaching the all of the blades; for vertical axis wind turbines, wind only has access to certain blades at any given point. Another reason HAWTs convert more energy is because the VAWTs' wind counters the blades. If an air current reaches one side of the turbine, it typically touches two different blades; this pushes one blade in a productive direction while other air molecules push the second blade in an opposite path. These two blades battle each other to decide which way to turn. Because it has so many fans.
Although wind powered energy is very useful, there are also a couple of drawbacks to this technique to harness energy. One issue with using wind turbines is the initial cost and time for the original construction and design. Both vertical and horizontal axis wind turbines are very expensive and can cost up to ten thousand dollars per one wind turbine depending on the size and location of the machine. Wind turbines are designed and perfected to suit a certain area of wind or to compensate for obstacles blocking air currents. Once a wind turbine is built, there are no possibilities for relocation. This can provide major problems especially if it is angled incorrectly or the wind patterns change over the course of several years. These machines also have the ability to impinge on bird populations in certain areas. As birds migrate, they are unaware of this new and powerfully lethal structure; the blades carry so much impact force it kills a bird if it comes in contact. Benefits of wind turbines include an environmentally friendly process of generating energy from a renewable resource.
To experiment, the class set up several portable fans and turntable posts. The fans simulated the wind and the post provide a base for the wind turbine design. The turning points on the base rotate and are attached to a device that is capable of measuring the amount of energy is being processed. Our goal was to design the most energy efficient VAWT and HAWT and compare several designs and data results. This experiment helped introduce the idea of wind powered electricity and different techniques to develop an environmental friendly method of using a renewable energy source.
|
Vertical Axis Wind Turbines
VAWTs(top slideshow) are typically used to power smaller complexes; they are usually too expensive and inefficient to construct for a normal house. A positive feature of VAWTs include the fact that wind from any directions or angles can power electrical energy. These wind turbines take up a limited amount of space and can be located in public places because they are not as dangerous. A downside to these wind turbines is sometimes it needs a small charge of electrical energy to encourage movement and rotation because the wind's energy is not adequate to start the turning motions. Although the wind turbines can produce more energy than it needs to start, this design is still not as efficient as possible. What do you call a power failure? |
|
Horizontal Axis Wind Turbines
There are several benefits to using horizontal axis wind turbines, also known as HAWTs(bottom slideshow). These wind turbines can convert relatively a lot of wind energy into usable electrical energy. HAWTs are used to generate power for large companies for several reasons. First of all, HAWTs are more expensive to build. This type of wind turbines also require a sufficient amount of empty space to insure the blades are not hazardous to civilians. These blades rotate with more force than VAWTs and reach closer to the ground so they can be quite fatal, especially for birds. Unfortunately, horizontal axis wind turbines can only receive air currents from one direction and is completely stationary after the turbine is built. |
Physics Principles
This project focused on thermodynamics, the study of heat and energy. This includes information concerning the transfer of heat, different laws that pertain to energy, and the diversity of materials that affect the specific heat capacity. All of these concepts pertain to our major project and related specifically towards certain of aspects, such as material testing, solar water heater, and wife turbine design.
Altogether the Laws of Thermodynamics consist of four separate ideas named the first, second, third, and zeroth law. The zeroth states that if system one and system two have both reached equilibrium with a third system, then they are also in thermal equilibrium with each other. This means if A=B and C=B, then A and C are equal. The rule of the first law is the conservation of energy. All of the energy in the universe can be distributed, reused, or converted, but cannot be created nor destroyed. The second law of thermodynamics include entropy and disorder towards reaching equilibrium. This law proclaims that the greater entropy, the more disorder, and vice versa. The idea of this law means the greater difference of two thermal energy levels, the faster the two systems will become equal temperatures. For example, a boiling cup of water will cool down faster in a freezer than if it is only located on a room temperature countertop. The belief that temperature can never reach absolute zero is the third law of thermodynamics. This means all objects will always maintain at least a small amount of energy.
The measure of the amount of heat an object can retain is considered its Specific Heat. Different materials or elements posses a unique specific heat making the beneficial for different reasons. The rate a system gains heat is typically the same rate thermal energy is lost; if an object can absorb heat quickly, then this material usually does not trap the heat successfully. Water has a very high specific heat of 1 calorie per grams times degrees(Celsius), unlike iron. Water takes longer to heat, but its temperature will decrease slower after the energy source has apperated. Iron won't hold its heat, but takes much less time heat. Specific heat can be used to determine the time of heating, mass, or temperature of an object if enough information is present.
The purpose of a Thermal Mass is for daytime heat to stay inside the building throughout the night. In the morning, the room should be warmer than outside and it should require less energy to heat again. This is especially important during winter months to insure a suitable temperature is maintain with electrical heating. To select a thermal mass, we chose a material with a very high specific heat. This material would absorb sunlight in the day and slowly release thermal energy once the sun sets and continue this process every day.
Another topic we covered in this project was the differences between Radiation, Convection, and Conduction. These are a variety of methods heat is transferred. Radiation occurs when thermal energy is is reflected off an object and travels through waves, particles, or rays; this heat is then absorbed in a second system. Convection is a heat transfer that occurs through a fluid, such as air or water. For example, there are convection currents in the Earth's mantle that circulates the magma depending on the temperature. A transfer of heat through two directly touching objects is considered conduction. Conduction occurs when a stove top warms the bottom of a pot. The water inside the container is boiled because of convection currents and the heat you feel if you place your hand above the lid is radiation.
In this unit, I learned the justification for Why Heat Rises. All objects posses molecules that are composed of atoms. As an object is warmed, these molecules begin to move faster and faster; this forces molecules to collide with one another due to the lack of space available. The molecules will create a larger pressure until the object expands because pressure, volume, and temperature of a constant substance of a gas are all directly correlated. A formula for this is PV=nRT. Pressure times volume equals the amount of a substance times the gas constant multiplies by the temperature of the gas. This means if the temperature increases, but the volume stays the same then the pressure increases. Other variables can also change to compensate for the difference in other factors. The number of molecules remain the same so the pressure increases. Atoms will always travel to an area with less pressure; in this case, that would be up, towards less atmospheric pressure, so it can reach pressure equilibrium with the gas that surrounds the molecules. Of example, a balloon filled with air molecules will rest on the floor. After heating the balloon, the air molecules will move faster and the size of the balloon will augment due to the fact the latex is pliable. As the balloon expands, the pressure inside the material will become less than the air around the balloon; this causes a rise in the object to compensate for the difference in the two air pressures.
Another concepts taught this section was the difference between Heat and Temperature. The amount of thermal energy in a system is considered the heat of an object. It is typically measured in Joules or Newtons times meters. Temperature is a measure of average motion in molecules and has a unit of Celsius, Fahrenheit, or Kelvin. Typically, if heat increases then temperature will also increase. One exception to this general consensus is latent heat. For example, water needs a certain amount of energy to changes states, but the temperature can vary while water is in a specific form.
The specific heat capacity of an object can also depend on the Color Of The Material. Lighter colors can absorb more heat than dark materials. The majority of light, including sunlight and light bulbs, are white light and it gives out all of the colors in the light spectrum. The white material is able to absorb every color of the light and therefore, no specific color is visible. The exact opposite effect for materials that are black; none of the colors from white light is absorb so all of the colors are reflected and shown to the human eyes. Since the lighter material absorbs more beams of light, it naturally contains a lower specific heat; this occurs because the faster an object absorbs heat the sooner the material loses its heat. *I will add more information and descriptions when I am not completely zombie like due to the late, or should I say early, hour it currently is.
Researching Justification Concerning Energy
As a class, each group researched a different topic concerning energy sources and the damages to the society. Each group presented their discoveries and taught the class the information they learned. Using this method, everyone in the class was able to collaborate and practice sharing ideas with larger groups of people. Each group typed their knowledge into a shared google document; this is a great way to incorporate technology into the subject we are currently studying.
As a class, each group researched a different topic concerning energy sources and the damages to the society. Each group presented their discoveries and taught the class the information they learned. Using this method, everyone in the class was able to collaborate and practice sharing ideas with larger groups of people. Each group typed their knowledge into a shared google document; this is a great way to incorporate technology into the subject we are currently studying.

Passive Solar Home
The major focus was to design blueprints, a model, find a location, create a budget, discover materials, highlight key features, and attempt to convince six judges to support your idea out of sixteen other magnificent and carefully detailed plans. This project required a lot of dedicated hard tedious work and revisions, but the outcome was quite impressive to reflect upon. A current event. *View PowerPoint, model, blueprints, and budget below.
The major focus was to design blueprints, a model, find a location, create a budget, discover materials, highlight key features, and attempt to convince six judges to support your idea out of sixteen other magnificent and carefully detailed plans. This project required a lot of dedicated hard tedious work and revisions, but the outcome was quite impressive to reflect upon. A current event. *View PowerPoint, model, blueprints, and budget below.
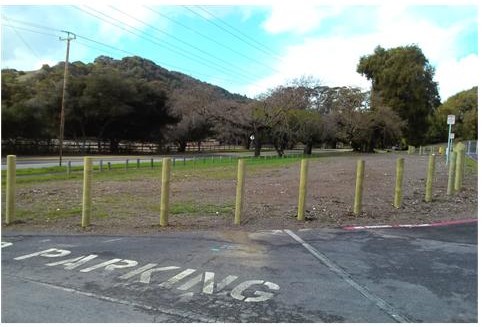
Picture of Ideal Superb Site Selected for Student Store(hypothetically located on the right side of the third slide in PowerPoint above)
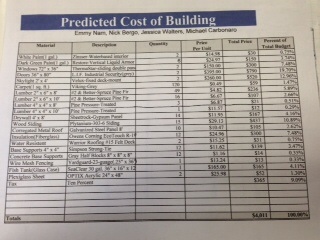
All items are found at Lowes(excluding the fish tank
*If you would like to view a clearer copy of the final budget, please email me at: [email protected]
|
Scaled Blueprints For Student Store and Budget
In order to justify that our building's infrastructure is stable, I had to draw several complex scaled blueprints. These designs needed to be accurate and realistic to serve their purpose. The reason for drawing blueprints was to provide a feasible evidence that our building can be assembled. Our blueprints were required to show the exact dimensions of each material exhibited. This includes rough openings, wooden supports for doors and windows, lumber beams, thermal mass, angle of the roof, concrete support posts in the floor, sections of drywall in the roof, distance between lumber beams, and thickness, height, and length of the walls. Due to fact my blueprints were very precise and indisputable, the list for quantity of materials was relatively simple to generate. Spectators and the general public would need to view a comprehensible visual to display the basis supports of our structure. What is sun-tan lotion? Throughout this project, our ideas changed along with my blueprints. At first, I only sketched a rough idea of the area of the building and placement of the windows or doors. After figuring out the exact brand window and rough opening, I redrew my set of blueprints to model the same measurements. Although the features were positioned correctly, there was still the matter of spacing lumber properly to correspond with window or door the walls were compulsory to support. A couple of days after the blueprints were completed, I've class was informed that a state permit was necessary if a structure was over one hundred twenty square feet. Unfortunately, this forced our group to redesign the dimensions of the walls and therefore reduce the size of our scaled blueprints. Because the basis for our building evolved, I drew all the blueprints about three different times and redrew the east and west wall four times. |
|
Model of Student Store
In order to accurately present our passive solar home, my group needed to build a model. On this scaled model, there are different materials used to represent the purpose of the actual materials planned to use. It is vital for our model to be accurate; during our presentation, my group referenced our model several times. If the size and dimensions were incorrect, our entire PowerPoint and speeches would be giving false information to the general public. Our model shows each element exactly, including the overhang, thermal mass, doors, windows, and concrete base supports. A solar insulator. |
|


Reflection
There were several very challenging parts to this project. The amount of precision needed and time this designing required was significantly greater than previous educational activities. For this project, it was difficult to completely design a stable and sound structure that was actually going to be constructed. This added extra pressure because our building would affect the rest of the community. It was arduous to attempt to design an entire building when I had no experience in the construction. Prior to this project, I had no idea what 4 x 6 lumber even was; yet, I was tasked to plan out the whole building of a structure. Throughout this project, I learned several new things, like how to draw blueprints, how to install windows, and how to place insulation. The most important thing I learned was that with preservation anything can be achieved or perfected. For example, I drew and redesigned my blueprints at least three times over. This laborious project needed a lot of focus in order for the outcome to turn out satisfactory because perfection was essential. An aardvark doesn't like eating worms, but he can't resist-ants.
Another very important thing I learned from issues that were apparent was the fact that sometimes the people you work with don't contribute beneficially. For the first time this year, I faced many problems with the functioning of my group. Unfortunately, in the future, I will probably be forced to work with others who don't agree with my work ethic or process. I believe this project showed me that there will be times in group work when I will be forced to compensate for the lack of participation of coworkers or two people's diverse personalities will clash while deciding on important factors. Whenever working in a group, compromise is a very important life skill to procure in order to succeed in the task. Whether a person is sacrificing their idea, opinion, or extra time, it is crucial to cooperate while working in a group. *For the benefit of distributing credit, I would like to highlight the fact that the vast majority of the work in this project was completed two people, Nick Bergo and me. In fact, at times, it felt like the remaining to group members were counter-productive because they would distract each other and extra time would be used to explain the concept or reasoning a second time.
Although this project provide several challenges, I believe there were still many aspects that prospered in our group. For example, my group was very prepared for the presentation. Beforehand, we ran through the PowerPoint approximately ten times before the actual speech. We were also rehearsed our parts while timing to insure the set time limit was an achievable goal for the amount of information. The first attempt at running through the design, it took about eight minutes, which is twice the limit provided. After we all became more comfortable with the facts and slides, we were able to cut down on the number of 'umms' and 'ahhhs' and overall speed up our presentation. I think practicing is an important part of any type of project or presentation.
Self-sufficiency was a very critical life lesson I learned from this project. Due to the fact my group members didn't take leadership roles, I had the opportunity to make the majority of the decisions. With this privilege, I also had to commit more of my time and effort into this project than others. Sometimes, I needed to just figure matters out on my own rather than rely on others for assistance. I think this actually worked well because I didn't need to worry about including everyone's idea or fret whether or not the work would be accomplished.
